Monday, August 24, 2015

Zucchini noodles with marinara & meatballs

My fitness Adventure has been on a up and down and as with a lot of you out there, it has been a struggle at times.
One of my struggles is having someone to workout with and it had me in a lil depressed and feeling slumped.  I see many having fun and working out with a friend but none of my friends are into fitness or wanting to try it.

How do I get out of this slump?

I started thinking about why I got into this  from day one and how I have been dealing with living healthier and it didn't matter anymore about having someone to workout with.  I started this with intentions of making my life healthier, live better and feel stronger.  The people I workout with in bootcamp make it worth going and my trainer has been behind me since day one. So things are starting to look up once again.

One of my son's is into fitness and trying to eat healthier so I thought why not try something with him.  Although he is doesn't live close to me to hit the gym together we can at least eat healthier together.  We are starting a low carb diet (yes, once again for me!) and the loser will by the other dinner.
I have been looking online for some new recipes to try.  He is very excited to start this with me and I can't wait to see how this adventure will go with him.

Here is something I whipped up last night for dinner.

Zucchini noodles, veggies with meatball marinara-

I don't have one of those fancy noodle machines so I had to do my zucchini by hand using a peeler and cutting it to make strings. Took a bit to do but it was worth the hard work.


I sauteed it in olive oil on med heat for 5-6 mins.


After I sauteed the noodles I sauteed mushrooms in olive oil for 5-7 mins sprinkled with salt (add more olive oil if needed) then added spinach for another min. DONE!
I used my mother in laws (she won't allow anyone to have her recipe other than family, sorry) marinara and meatball recipe. Topped with parm and a few dashes of dried chile pepper. YUM!!!

What are some of you favorite low carb dishes you enjoy? Do you feel slumped at times? if so, what do you do to get out of it? 

Here is to a positive/healthy week!

Tuesday, June 2, 2015

Running

Bootcamp was a good workout (leg day) but I felt so out of juice. Today's workout was: sit ups, tire jumps, box jumps with burpees, and KB swings 15, 14, 13... So you do each workout 15 times then again but 14, and again 13, and so on till you do each workout once. In between each rep he had us run around the gym. Good workout and easy to try at home with any workout.

When my workout doesn't go how I want I don't give up but there are times I just need to take a break.  When I started out my workouts last year I had to run and I hated it (still do!)!  I was always last and just dreaded it.  My trainer would run behind me just to push me to do it. heehee...

To this day my trainer will have us run and although I do it (OH BTW, he doesn't run behind me anymore), I still can't get into it.  I am no longer the last one and although I do feel like a speedy Gonzalez at times I still dread it.  So one of my goals is to stick to the running, run more often and hoping to finally enjoy it.

So it got me thinking and I found this article.

When will running start feeling easier?

Do you run? Struggling to enjoy it?

I'm hoping I will one day but until then I will start reading more about it & work on running more often. *wink*

Friday, May 29, 2015

My fitness frenzy

Focused and Ready!


Since my last post I still have been active in the gym and sticking to my workouts.  I even got my husband to join the gym too! 

I didn't really stuck to my low carb diet but that will soon change.  Before my trip to NY I wasn't really doing to bad in the gym but I wasn't really focused either.  It was more like a chore.  I just made it feel like I had to get up and go but didn't really feel the whole vibe.  After coming back from our trip tho something changed.  I just looked at the whole thing differently.  I felt good when I first started this fitness frenzy, I ate good, felt good, I worked out daily, I was determined.  

What changed? Why did it change? What could I have done differently? So much was going thru my mind and I was feeling drained in my body.

I have been doing a lot of research online, youtube videos, reading books; on workouts, health, eating, weight lifting, etc. and each time I do I get more and more pumped to do this for me.  I'm finally understanding a lil more but I have a lot to learn.

So I have decided one step to get my fitness to a good start is to blog about it.  I want to do a daily log, list of workouts, a gym terminology, health, eating, journal and who knows what else I may find on my way down this new fitness path.  I need to stay focused, hang out with those that motivate me, eat better, and just stay on track.  This is a life long change for me.

I of course have a passion to be in the kitchen so don't worry I won't stop posting my fun kitchen adventures as well. *wink*

Wish me luck! 

Stay tuned...

Thursday, April 2, 2015

Do I Dare!

Do I Dare!  
With Easter coming up so quickly I need to come up with a menu to make for the potluck at my sisters this year. If you are like me and wait till the last minute then you know how stressed out I am here! *wink* Things creep up so quickly, then I am stuck the night before cooking up a storm. AH!!! Then when the day is over I tell myself I will do better next year. *yea, right!* 
This year I have come up with something new and something I think that will not only surprise my family but it will be something they enjoy a lot!  


The first time I had this dish was when my husband took me to a nice newer restaurant down town called The Kings Head, the owners are just the friendliest, funniest guys I've met.  Of course, this dish wasn't the only thing we had while we were there. A few fists of pints were just the right touch. *smile*

Recipe can be found here 
Once I make these this weekend I will post the pictures. 

Here is my pic:

My prep ^ 
Then my finished meal 


These turned out very good & everyone loved them!
Definitely making them again. *wink*

Another recipe I will be making will be a Tortellini Salad


Recipe can be found here
I wanted something not so heavy and I know all the veggies here will be a plus for everyone. We just started to grow our veggies last weekend so seeing all those in this salad will just encourage us all to grow a lil more!  Doesn't hurt right? *wink*

Here are my updated pics:

Ingredients ^

The final meal together- yummy!


Whats on your menu this year?

I hope you all have a wonderful Easter!
Bon Appetite!

Tuesday, March 17, 2015

My Healthy Adventure

My Healthy Adventure

I have been on a healthy adventure for almost a year now but it has been a struggle to stay on it.  I have my ups and downs as with anyone else struggling to get healthier or to lose weight.  

I started back in May when my niece convinced me to join bootcamp with her. I am so thankful that she did and from day one I was hooked! Although I couldn't complete the first days class fully I didn't give up and kept going. I still show up when I can.  There are days where my knee goes out, my shins are on fire, being sick, or like now my tailbone is in pain due to falling down the last steps of my stairs in the house. lol BUT, I will not give up!!! Almost a year to the day and I just can't go backwards now.  My goal at first was to lose 50 lbs in 6 months but then looked at the long term view.  I have lost 40 lbs and didn't get to the 50 lbs goal but I don't worry. I feel stronger, healthier & I have more energy.
 So my thoughts now are to stay strong, have more energy, eat healthier and live longer. :) 
I decided to start my low carb diet again and after my 30 days I know I will feel much better and I will eat healthier. 
So, here is my breakfast on day one...


Roasted Cauliflower, tomato, green onion and egg scramble.

Low carb doesn't have to be scary and there are so many recipes out there to make it possible to enjoy!
You will see more healthy recipes soon.  Of course, me being a Chef I have to always cook up anything that looks good and even though I can't eat it, I can taste it and someone else can enjoy it! *wink*


Thursday, January 15, 2015

Pan de Marranitos

My new year started out with my son breaking out in hives, suffering from his allergies and asthma then on top of that I woke up sick and back to the flu that I was just getting over from Thanksgiving. Lovely start right? :)

Did you make any goals for 2015? 
One of my goals this year is to jump back into my blog and keep up with my recipe postings and sharing more of my adventures on catering, cooking and home classes.  So you will be seeing more of me and lots of new changes. *yippy*

This years goals are:
Home cooking classes
Baking *YIKES, I can cook but baking scares me!*
meal/app trays
new dishes
healthier eating
continue bootcamps/workouts
build muscle and lose fat
more energy &
say "NO!" more often.  This is a hard one for me as I like to make people happy.  I tend to do things for others and get nothing in return when I ask for a favor. :(

Where I am in this town there is lil to no bakeries.  Of course, you have your grocery store bakeries but I want a real bakery with fresh made breads and a great selection. This has been something that has been hard to find around here unless I drive miles and miles away to get it and that is just something I am not willing to do with my already busy schedule.
So, for my first tackle on baking is making something that is hard to find for my dad in the mornings. A Mexican bread that is one of my favorites to have with my coffee in the mananita (morning). 
I don't have the pig cookie cutter yet so I just used a heart shaped cutter I had (remember I am not supplied with baking supplies) in the drawer. So my bread is called pan de amor instead of pan de marranitos. *wink*
They turned out very yummy and my house smelled nice all day!
ENJOY!


Recipe can be found here  pan de marranitos

Monday, June 24, 2013

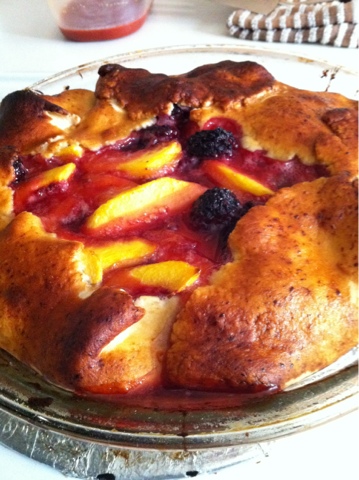
Blackberry and Peach Crostata

This dish has to be my all time favorite Dessert.  The first time I made it I was in Heaven! Im not a big dessert type of person because most all of them are too sweet for me, this wasnt.
I LOVE LOVE blackberries & peaches!!! So the first bite, I was in love! 


This recipe I seen on The Chew & I had to try it, im so glad I did. Thank you Mario! *smile*
I used a basic simple pie recipe instead of the one used on Mario Batali's recipe.


Above is what it looks like before the miracle happens.


Oooooo my mouth is watering! Doesnt it already look yummy?


And here it is... Mouth full of wonders!! Isnt it beautiful? 
So quit drooling on here and go in your kitchen and make this for dessert tonight.
Its simple & quick. 


RECIPE- 

* PEACH AND BLACKBERRY CROSTATA
Dough:
2 1/2 cups cake flour, plus more for dusting
3 tablespoons sugar
1/2 teaspoon salt
Grated zest of 1 lemon
1 cup (2 sticks) cold unsalted butter, cut into small chunks
1/4 cup ice water, plus more if needed
Filling:
5 large ripe peaches, pitted and cut into 16 slices each
2 pints fresh blackberries
Juice of 1 lemon
3 tablespoons sugar
1 tablespoon all-purpose flour
Finish:
2 tablespoons honey
1 large egg, at room temperature
1 cup mascarpone or freshly whipped cream
Make the dough: Combine the flour, sugar, salt and lemon zest in a food processor. Add the butter and zap quickly until the mixture resembles coarse crumbs. Add the ice water, 1 tablespoon at a time, and zap until the dough just forms a ball without being too wet or sticky. Remove the dough from the processor and pat it into a flat disk, about 2 inches thick. Wrap it in plastic wrap and refrigerate it for at least 30 minutes.
Make the filling: Combine the peaches, blackberries, lemon juice, sugar and flour in a large mixing bowl. Toss the mixture gently to coat the fruit.
Heat the oven to 375 degrees.
Remove the dough from the refrigerator and allow it to soften enough to roll out.
Sprinkle your work surface and a rolling pin lightly with cake flour. Roll the dough out into a 16-inch round, about 1/4 inch thick. If the dough tears, press the edges back together. Transfer the dough to a 12 1/2-inch fluted quiche pan or tart pan with a removable bottom, allowing the excess to hang over the edges. Spoon the fruit mixture into the dough. Fold in the overhanging edges of the dough, leaving a 6-inch area of fruit exposed in the center. Press the crust into the rim of the fluted pan to form an edge.
Place a heatproof bowl over a saucepan of simmering water (or use a double boiler), and heat the honey in the bowl until it is thin. Add the egg and whisk them together. Brush the mixture liberally over the fruit and crust. Place the tart pan on a baking sheet, and bake for 1 hour and 10 minutes or until the crust is golden brown and the fruit is bubbly. Remove it from the oven and let it cool slightly.
Serve the crostata warm or at room temperature, with a dollop of mascarpone or whipped cream on each serving.
Serves: 8 to 10.
Recipe courtesy of "Molto Batali" (ecco, 2011)

Friday, June 21, 2013

Buffalo Chicken Loaf

Every time I get invited to a BBQ or some potluck event everyone expects me to take something different.  Its nice to know there are people out there that likes my food *smiling*.  
The day before I had picked up a rotisserie chicken for dinner & I had leftovers.  I had a loaf of french bread in my breadbox (always have some type of bread in this kitchen) & I was praying that I still had hot sauce in my fridge. I DID! 
So, my wheels started turning & I came up with bbq chicken on a french roll. 

This is the before pic


And this is when its cooked...


I cut them in smaller pieces & everyone really enjoyed them! (Of course!) *smile*

Recipe-

Marinate-
About two cups of cooked chicken, cut in bite size pieces.
1/4  cup franks red hot sauce (love this stuff!)

Add hot sauce to chicken & let sit for about an hour

1/4 cup franks red hot sauce
2TBL butter
1 celery stick, chopped finely
Mozzerella cheese (above I used a mix of cheeses I had leftover)
Bleu cheese dressing 
Blue cheese crumbles (optional)
Cilantro, chopped
French bread, sliced in half

Heat the hot sauce with butter & let cool.
To assemble french loaf pizza; brush your cooled sauce on bread, sprinkle cheese over sauce, sprinkle celery, add marinated chicken, then drizzle blue cheese dressing over the entire loaf (add as much dressing to desired taste which brings in the blue cheese crumbles if desired, i personally dont add too much of either to balance both dressing & crumbles), drizzle a bit more hot sauce over loaf, top with a sprinkle of cheese & cilantro.
Heat under broiler for 3-4 minutes
Slice into smaller pieces & serve.

Enjoy!


Sunday, January 20, 2013

Cornish Game Hen with Sage butter

This was my first attempt on making game hens. How could a little bird be so hard to cook when I have no problem cooking much bigger birds (Turkey)? Maybe its just the thought of trying something new?
I have recently been trying to make or try something new so I decided on this.
This recipe can be found here: http://www.foodnetwork.com/recipes/sunny-anderson/butterflied-cornish-hens-with-sage-butter-recipe/index.html
This was very tasty!

I didnt use the sheet pan like it mentioned. I used the same cast iron skillet that I used to brown the bird to put in the oven & basted it half point & again when I took it out of the oven.

What will I try next? Stay tuned. *wink!*

Saturday, October 27, 2012

Yeast Pancakes like from DDD

I made these after seeing the triple D show on food network channel.
The apple caramel with brie was delish!
I had fun trying this & I definately will be making these again.
I will be back to post the recipe veey soon!

Tuesday, August 28, 2012

Mini Pizza Pockets

Mini Pizza Pockets


The other day I was just going to make pizza dough and make my son a grilled pizza out back on the grill.  I decided to just do some mini pizza pockets and see what the boys would say.. They loved it!
I wasn't sure how to seal the edges so I just dabbed a little water on the edge and pinched them closed.  It worked.  The ones I didn't do this to, looked like a mess and of course that picture is not shown. *wink*

These are just the basic pepperoni filled ones but I had things rolling in my head while making these.. hamburger, veggie, meaty, even sweet fillings.. yum!  I can't wait to try these again.

Wednesday, January 4, 2012

Cheeseburger Salad

 I found this idea on The Pioneer Woman and thought I would try it... OMG, I am glad I did!  This was super easy and super delicious to eat!  I could eat the croutons itself it was so good!

{THIS PICTURE IS FROM HER WEBSITE}

If you want something with less carbs in a cheeseburger, you need to try this!  You won't regret you did. Enjoy! 


These croutons were simple to do.. hubby looked at me cut the hamburger buns and thought I was nuts but once he tasted them, he thought they were great!  (from the man who still tries to tell me how to make a dish from his no knowledge of cooking.. lol)  I used 2 hamburger buns (tops and bottoms) and just cut them in little squares. I sauteed them in 1/2 stick of butter for about 10 minutes.. just until they got to where I liked the crunch in them.  (after a few taste testers, i'm surprised there was any left.. *wink*) set aside when done... nibble on a few while you make the main course! ;) 
Below are the things I added and the final shot:


-Shredded Cheese-


-Condiments include... chopped pickles, scallions (original recipe called for red onions but I prefer scallions), and chopped tomato-  are you feeling it yet?! :)


In a pan brown your meat and drain off any fat.
add in... 
 - Sauces: a squirt of ketchup, a squirt of deli mustard, a squirt of ground mustard, and a squirt of bbq sauce (mine was chipotle bbq).


{AND MY PICTURE OF THE FINISHED DISH}


And this is what you will have when you layer the meat on top of your chopped salad and top with your condiments! YUMMMMO!!!   
This would be a great superbowl dish!

RECIPE (copied from The Pioneer Woman website):

Ingredients


  • 2 pounds Ground Beef
  • 1/3 cup Ketchup
  • 1 teaspoon Yellow Mustard
  • 1 Tablespoon Dijon Or Spicy Mustard
  • 2 Tablespoons Barbecue Sauce
  • 2 heads Romaine Or Green-Leaf Lettuce, Torn
  • 8 whole Dill Pickle Spears, Cubed
  • 4 whole Roma Tomatoes, Diced
  • 1 cup Grated Sharp Cheddar Cheese
  • 1 whole Red Onion, Sliced
  • 4 whole Hamburger Buns
  • 1 stick Butter

Preparation Instructions


(Adapted from The Pampered Chef.)

Brown meat in a large skillet, then remove from heat and drain off the fat. Add ketchup, mustards, and barbecue sauce to the meat and stir to combine. Taste and add more of whatever you think it needs. Keep warm.

Cut hamburger buns into 1-inch cubes. Melt 1/4 stick butter in a separate skillet, then add the bread cubes and toss to coat. Toast the croutons in the skillet over low heat for about 10 -12 minutes, adding 1/4 stick of butter every couple of minutes until you've used the whole stick. (This will ensure all the croutons soak up the butter and toast nicely.)

To assemble each salad, pile torn lettuce on a plate. Pile on a good quantity of the meat mixture, then top with plenty of grated cheddar. Add diced tomato, chunks of pickles, and slices of red onion over the top, then sprinkle warm croutons all around the plate.

Monday, November 7, 2011

Its been a while....

Its been a while since I posted anything new.  We had a set back with things here at home with my mom and her health issues... she is recovering nicely so we can only hope for the best.
With that said.. back to cooking!  I have a few things stirring up in the kitchen for this month so stay tuned!
I wish you all a wonderful November!  Stay warm.

Saturday, September 10, 2011

Macaroni and Cheese Carbonara

-Before the oven-


For Thanksgiving I thought I would try a new mac and cheese dish and when I received my foodnetwork magazine in the mail,  I seen this recipe and although it was a spendy dish to make (I hear this all the time from my hubby when I even mention making mac and cheese now! *wink*) I had to do it and everyone loved it!

Below you will find the recipe (says it serves four but I served 8 with the extra cheese) and a photo of Bobby Flays dish.

RECIPE:
Serves:
4 servings

Ingredients

  • Unsalted butter, for the baking dish
  • 1 tablespoon olive oil
  • 1 1-inch-thick slice pancetta, cut into small dice
  • 4 cloves garlic, finely chopped
  • 3 tablespoons all-purpose flour
  • 5 cups whole milk, or more if needed, hot
  • 4 large egg yolks, lightly whisked
  • 2 teaspoons finely chopped fresh thyme leaves
  • 1/2 teaspoon cayenne pepper
  • 2 cups (8 ounces) grated asiago cheese, plus more for the top
  • 1 1/2 cups (6 ounces) grated Irish white cheddar cheese, plus more for the top
  • 1 1/2 cups (6 ounces) grated American cheddar cheese, plus more for the top
  • 1 cup (4 ounces) grated aged fontina cheese, plus more for the top
  • 1/2 cup freshly grated parmesan cheese, plus more for the top
  • Kosher salt and freshly ground black pepper
  • 1 pound elbow macaroni, cooked just under al dente
  • 1/2 cup coarsely chopped fresh flat-leaf parsley leaves

Directions

Preheat the oven to 375 degrees F. Butter the bottom and sides of a 10-by-10-by-2-inch baking dish and set it aside.
Heat the oil in a large saute pan over medium heat. Add the pancetta and cook until golden brown on all sides, about 8 minutes. Remove with a slotted spoon to a plate lined with paper towels.
Add the garlic to the fat in the pan and cook until lightly golden brown, 1 minute. Whisk in the flour and cook for 1 to 2 minutes. Whisk in the hot milk, raise the heat to high and cook, whisking constantly, until thickened, 3 to about 5 minutes. Whisk in the eggs until incorporated and let cook for 1 to 2 minutes. Remove from the heat and whisk in the thyme, cayenne and all the different cheeses until completely melted. Season with salt and pepper. If the mixture appears too thick, add additional warm milk, 1/4 cup at a time.
Put the cooked macaroni in a large bowl, add the cheese sauce, reserved pancetta, and the parsley, and stir until combined. Transfer to the prepared baking dish.
Combine an additional 1/4 cup each asiago, cheddars, fontina and parmesan in a bowl and sprinkle evenly over the top. Bake until the dish is heated through and the top is a light golden brown, 12 to 15 minutes. Remove from the oven and let rest for 10 minutes before serving.

Oreo Cookies


Well, yesterday I tried these fantastic cookies that I found on PenandPaperFlowers blog (love her ideas!). Actually I belong to her group on facebook and she brought up a conversation on these cookies, so I thought I would try them out and I am glad I did, they are great!!!
A BIG hit here at home and I love the way they turned out. So small (bite size) and cute. Many possibilities with these cute little things for any event!
The first batch I did, I did with coloring the frosting a bit with red (which turned out pink but loved how the brown and pink came out which would be cute for a girls baby shower *wink*). Then rolled it in some chocolate sprinkles. Some I left plain for my picky eaters who don't like too much sweets.
Then I did a batch just the same but instead of using the vanilla extract as it called for I used peppermint extract and crushed up some peppermint candies and rolled them in that! Great for Christmas! *wink* So the possibilities are endless I am sure.
I did a few bigger than the others but I would say my favorite are the mini size (about an inch) which are great for snacks. I also am freezing these for special events that happen often here at my home unexpected. *wink*
Thank you for the great recipe PenandPaperFlowers blog! All credit goes to you!!!


What you'll need:

Cookie Ingredients
1 package of devil's food cake mix
2 eggs
1/2 cup oil

Cream Cheese Filling Ingredients
1/2 cup butter (softened)
8 oz. cream cheese (softened)
3-4 cups confectioner's sugar (eye this as you will see the thickness you like)
1 tsp. vanilla

Alternative Vanilla Cream Filling Ingredients (I haven't tried this one yet but it was on the blog)
1/4 cup room-temp, unsalted butter
1/4 cup vegetable shortening
2-3 cups sifted confectioner's sugar
2 tsp. vanilla extract

Cookie Instructions
Heat oven to 350°.
Add oil and eggs to cake mix and blend together. (I used my Kitchen Aid mixer with a paddle)
Roll dough into 1/2" balls for mini oreos. (1" for oreo-sized cookies up to 2 1/2" for jumbo size). *Messy but worth it!*
Place on cookie sheet and bake for 8 minutes. (I didn't grease my sheets)
Remove from oven and let cool for 1 min.
Transfer to a cooling rack to cool completely.

Cream Cheese Filling Instructions
Cream butter.
Add cream cheese and mix well.
Add vanilla, stirring until well blended.
Slowly add confectioner's sugar until desired consistency is reached. (I used 3 1/2 cups)

Alternative Vanilla Cream Filling Instructions
Cream butter and shortening together.
Add vanilla extract and confectioner's sugar slowly - until desired consistency is reached.

Assembling the cookies:
Fill pastry bag or gallon size ziploc bag with filling. (I used a butter knife to spread on)
Sandwich two cookies together by squeezing 1 tsp. (or so) of the filling onto the center of one cookie.
Add the 2nd cookie on top.
Lightly press the two cookies together to help the filling spread evenly to the sides of the cookie without spilling over the edges. (unless you prefer it). *I also did a twist when I was pressing them down to secure better*

You can either serve them as-is or freeze them for a frozen treat.
You can also make-ahead, freeze and bring to room temperature on the day of your event/party.

All this is posted on PenandPaperFlowers blog.

Wednesday, August 31, 2011

Chili's Southwestern Eggrolls


I have never been to Chili's but someone told me about these and sounds delish and had to try them.  I love them and they were a hit!  A bit spicy but that is what we prefer.. you can adjust the spices so they aren't too spicy for you, add or omit a few ingredients is fine too.  
Serve with guacamole, salsa and sour cream.. yum!  
Why would I need to go to Chili's now!  *wink*

It is also a good recipe for that left over chicken you don't know what to do with.  This recipe calls for flour tortillas but you can also use eggroll wraps for a much crunchier, thinner taste. 
Recipe below:

INGREDIENTS:

1 chicken breast fillet
1 tablespoon vegetable oil
2 tablespoons minced red bell pepper
2 tablespoons minced green onion
1/3 cup frozen corn
1/4 cup canned black beans, rinsed and drained
2 tablespoons frozen spinach, thawed and drained
2 tablespoons diced, canned jalapeno peppers
1/2 tablespoon minced fresh parsley
1/2 teaspoon cumin
1/2 teaspoon chili powder
1/4 teaspoon salt
dash cayenne pepper
3/4 cup shredded Monterey Jack cheese
five 7-inch flour tortillas


DIRECTIONS:

Preheat barbecue grill to high heat.

Rub chicken breast with some vegetable oil then grill it on barbecue for 4 to 5 minutes per side or until done. Lightly salt and pepper each side of chicken while it cooks. Set chicken aside until it cools down enough to handle.
*I skipped this part and used leftover chicken we had and cut it up

Preheat 1 tablespoon of vegetable oil in a medium-size skillet over medium-high heat. Add red pepper and onion to pan and sauté for a couple minutes until tender.

Dice cooked chicken into small cubes and add it to pan. Add corn, black beans, spinach, jalapeno peppers, parsley, cumin, chili powder, salt, and cayenne pepper to pan. Cook for another 4 minutes; stir well so that spinach separates and is incorporated into mixture. Remove pan from heat and add cheese; stir until cheese is melted.

Wrap tortillas in a moist cloth and microwave on high temperature for 1 1/2 minutes or until hot.

Spoon approximately one-fifth of mixture into center of a tortilla. Fold in ends and then roll tortilla over mixture. Roll tortilla very tight, then pierce with a toothpick to hold together. Repeat with remaining ingredients until you have five eggrolls.

*Arrange eggrolls on a plate, cover plate with plastic wrap and freeze for at least 4 hours or overnight. ( I just let them sit for about an hour in the fridge before deep frying in oil).

Preheat 4-6 cups of oil to 375 degrees.
Deep fry eggrolls in hot oil for 12-15 minutes and remove to paper towels or a rack to drain for about 2 minutes. Slice each eggroll diagonally lengthwise and arrange on a plate.
Serves 3-4.

Chicken Carbonara

 
I watched a Giada show on food network and she made this wonderful, quick dish that I just had to try.  Everyone loved it!  
I bought a already cooked whole chicken from the deli and shredded it for a much easier and quicker meal.  One time I didn't nave Pancetta so I just used bacon and it turned out fine.
Recipe below:


Ingredients

  • 2 teaspoons olive oil
  • 4 ounces thinly sliced pancetta, chopped
  • 2 teaspoons minced garlic
  • 2 1/2 cups whipping cream
  • 1 cup freshly grated Parmesan
  • 8 large egg yolks
  • 1/4 cup chopped fresh basil leaves
  • 1/4 cup chopped fresh Italian parsley leaves
  • Salt
  • 1 pound spaghetti
  • 4 cups coarsely shredded chicken (from 1 roasted chicken)
  • Freshly ground black pepper
  • 1/2 cup chopped walnuts, toasted
  • 1 tablespoon finely grated lemon peel

Directions

Heat the oil in a heavy large frying pan over medium heat. Add the pancetta and garlic and saute until it is brown and crisp, about 8 minutes. Cool slightly.
In a large bowl, whisk together the cream, cheese, yolks, basil, and parsley to blend.
Meanwhile, bring a large pot of salted water to a boil over high heat. Add the spaghetti and cook until it is just tender but still firm to the bite, stirring occasionally, about 10 minutes. Drain.
Add the chicken to the pan with the pancetta and stir to combine. Next, add the spaghetti and the cream mixture and toss over medium-low heat until the chicken is heated through and the sauce coats the spaghetti thickly, about 4 minutes (do not boil or you might end up scrambling the eggs). Season the pasta, to taste, with pepper and salt if needed (the pancetta will likely add all the salt you need). Transfer the pasta to a large wide serving bowl. Sprinkle the walnuts and lemon zest over, and serve.

Tuesday, July 26, 2011

Mini Caramel-Brownie bites

So.. this is what my final result was on the caramel sauce and the brownies I made last night... I didn't have any white chocolate as I think they would have popped out a bit more with it on top (may have to try that later tonight).  I placed it in a mini cupcake wrap.  Which by the way was a Christmas themed one but can you see that part? no worries... :)

This is what it looks open -->

Chocolate heaven! 

In the middle of the sandwiched brownie is more caramel.  After taking a bite out of one tho.. I'm thinking adding toffee bits would be even better! :)

I dipped it in some melted chocolate and topped it with Caramel (adding toffee bits up there would be great too!)  oh.. my head is spinning!!  lol

My kids are going to love this!  Hey, lets be honest... who cares if they do because if they don't... that means more for me! *WINK*

Monday, July 25, 2011

Caramel


This is my home made caramel sauce that is waiting to be chilled for tomorrow dessert.  
I just pulled out my brownies from the oven and it also is cooling down for the dessert I will be making.  I can't wait!

To be continued...

Jumbo Maple-Pecan Scones


Now this is a Jumbo Scone!!!

This is another recipe from the FN magazine and it is one that was shown on the show "The Office" as one of the desserts offered. 
This to me was like a thick pancake with nuts, don't get me wrong it wasn't bad.. it was just very delicious but very addicting. ;)  
A great breakfast to go!

The recipe is below.

RECIPE:

Ingredients

  • 3/4 cup buttermilk, plus more for brushing
  • 1 teaspoon vanilla extract
  • 2 1/4 cups all-purpose flour, plus more for dusting
  • 1/4 cup granulated sugar
  • 1 tablespoon baking powder
  • 1/2 teaspoon baking soda
  • 1/2 teaspoon grated orange zest
  • 1/4 teaspoon freshly grated nutmeg
  • 1/2 teaspoon ground cinnamon
  • 1/2 teaspoon kosher salt, plus a pinch
  • 12 tablespoons (1 1/2 sticks) unsalted butter, cut into small pieces and chilled
  • 1/2 cup pecan pieces, toasted
  • 1/4 cup confectioners' sugar
  • 3 tablespoons maple syrup

Directions

Preheat the oven to 375 degrees F. Line a baking sheet with parchment paper. Combine the buttermilk and vanilla in a small bowl and set aside.


Put the flour, granulated sugar, baking powder, baking soda, orange zest, nutmeg, cinnamon and 1/2 teaspoon salt in a food processor and pulse until combined. Add the butter and continue to pulse until the mixture looks like fine meal.


Add the pecans and pulse once. Add the buttermilk mixture and pulse 3 or 4 times, or until the mixture is just moistened. (Do not overmix or the scones will be tough.)


Turn the dough out onto a lightly floured surface and gently knead until it just forms a ball. Transfer to the prepared baking sheet and pat into an 8-inch round, about 3/4 inch thick. (To make individual scones, cut into 8 wedges and space apart on the baking sheet.) Brush with buttermilk and bake until golden, about 25 minutes. Let cool 2 minutes on the baking sheet, then transfer to a rack to cool completely.


Mix the confectioners' sugar, maple syrup and a pinch of salt in a small bowl until smooth. Drizzle over the scone. Cut into wedges.

MY NOTES: 
Add some strawberries or some mixed fruit with this to balance the sweetness. 
You can also use the maple syrup mixture for dipping your favorite fruits... yum!

Enjoy!